You don't need a professional studio to take product photos that sell. With the right DIY product photography setup, a modest budget, and a few hours of practice, you can produce images that rival studio-quality output — right from your spare room, garage, or kitchen table.
At Pixel By Hand, we've spent over a decade editing product images for 380+ eCommerce businesses worldwide. We've seen what works, what doesn't, and where sellers waste money unnecessarily. This guide distils everything we know into a single, actionable resource.
Whether you're launching your first Shopify store or scaling an established Amazon listing, this is everything you need to get started.
Table of Contents
- Essential Equipment Checklist
- Choosing Your Camera (Without Overspending)
- Lighting: Natural vs Artificial
- How to Build a DIY Lightbox
- Backgrounds: White, Coloured, and DIY Options
- Setting Up Your Shooting Space
- Camera Settings That Actually Matter
- Styling, Props, and Composition
- Post-Production and Image Optimisation
- Common Mistakes to Avoid
- FAQ
Essential Equipment Checklist
Before you buy anything, here's a complete breakdown of what you need. We've listed budget and professional options so you can decide where to invest and where to save.
| Item | Budget Option | Est. Cost | Pro Option | Est. Cost |
|---|---|---|---|---|
| Camera | Smartphone (iPhone/Android) | £0 (already own) | Mirrorless or DSLR (12+ MP) | £300–£500 |
| Tripod | Amazon basics tripod | £15–£25 | Manfrotto or Joby with ball head | £60–£120 |
| Memory card | 16 GB SD card | £8 | 64 GB high-speed SD | £20 |
| White backdrop | White poster board or card | £3–£5 | Muslin roll or vinyl sweep | £15–£30 |
| Lighting | Window light + foam board reflector | £0–£5 | LED panel lights (pair) | £40–£200 |
| Foam boards / reflectors | White foam board (pack of 2) | £5 | 5-in-1 collapsible reflector | £15–£30 |
| Light tent / lightbox | DIY cardboard box build | £5–£10 | Foldable shooting tent (60 cm) | £25–£50 |
| Tape | Painter's tape | £3 | Gaffer tape | £8 |
| Table | Any flat surface or folding table | £0–£25 | Dedicated shooting table (60 cm wide) | £40–£80 |
| Budget Total | £40–£75 | Pro Total | £525–£1,060 |
The key takeaway: you can produce genuinely sellable product images for under £75. Most of the cost sits in the camera — and your smartphone is likely good enough to start.
Choosing Your Camera
You probably already own the right one
The biggest myth in product photography is that you need an expensive DSLR. You don't. A modern smartphone with a 12 MP camera is more than sufficient for eCommerce images, especially when products will be viewed on screens rather than printed.
In fact, oversized image files from high-resolution cameras can actually slow down your website, hurting both user experience and SEO rankings. For web use, you want sharp images at sensible file sizes — not 50 MP monster files.
If you're buying a dedicated camera:
- Look in the £300–£500 range for a mirrorless or entry-level DSLR
- 12–24 MP is the sweet spot for eCommerce
- Check photography forums for secondhand deals — a two-year-old model will serve you perfectly
- A kit lens (18–55 mm) covers most product photography needs
If you're using your phone:
- Use the rear camera, never the selfie camera
- Avoid digital zoom — it degrades quality. Move closer instead
- Lock the focus and exposure by tapping and holding on your product
- Turn off HDR mode for more consistent results
For a deep dive, check out our guide to mastering product photography with a smartphone.
Memory cards
If you're using a dedicated camera, pick up a memory card with at least 16 GB of storage. They cost next to nothing and mean you'll never run out of space mid-shoot. Get a high-speed card (Class 10 or UHS-I) if you're shooting in RAW format.
Lighting: Natural vs Artificial
Lighting makes or breaks product photography. Get it right and your products look professional. Get it wrong and no amount of editing will save the image.
Natural light: free and effective
Natural window light is the easiest, cheapest, and most forgiving light source for beginners. Here's how to use it properly:
- Position your table beside a large window — the bigger the window, the softer the light
- Keep the window at 90 degrees to your shooting surface for even, directional light
- Turn off all room lights — this is the single most common mistake beginners make. Overhead bulbs introduce mixed colour temperatures that create an unpleasant yellow cast
- Avoid direct sunlight — harsh sun creates strong shadows and blown-out highlights. Overcast days or diffused window light give the best results
- Use a white foam board on the opposite side of the window to bounce light back and fill in shadows
The distance rule: The closer your product is to the window, the softer and more dramatic the light (with darker shadows). Further away gives more even illumination with lighter shadows. Experiment to find what suits your product.
When natural light works best:
- Small to medium products
- Organic or lifestyle-style imagery
- Shoots that don't require perfect consistency across hundreds of SKUs
When natural light falls short:
- You need identical lighting across a large catalogue
- You're shooting at night or in a room without good windows
- You need full control over shadows and highlights
Artificial light: consistent and controllable
If you're shooting regularly or need consistency across your product catalogue, artificial lighting is worth the investment. The primary advantage is repeatability — every image has the same tone, colour palette, and exposure.
Getting started with artificial light:
- Start with a single LED panel (£20–£100). Position it at 45 degrees to your product
- Add a second light when you're comfortable, to fill shadows on the opposite side
- Diffuse the light using a softbox attachment or even a sheet of tracing paper — this eliminates harsh shadows
- LED panels are the best value: cool-running, adjustable brightness, daylight-balanced, and portable
Don't overdo it. One well-placed light with a reflector on the opposite side handles 90% of product photography needs. Adding more lights introduces complexity — more shadows to manage, more colour spill to correct.
Pixel By Hand tip: When you choose your lighting, consider the material of your product. Reflective surfaces (jewellery, glass, metal) need soft, diffused light to avoid harsh hotspots. Matte surfaces (fabric, wood) are more forgiving and work well with directional light.
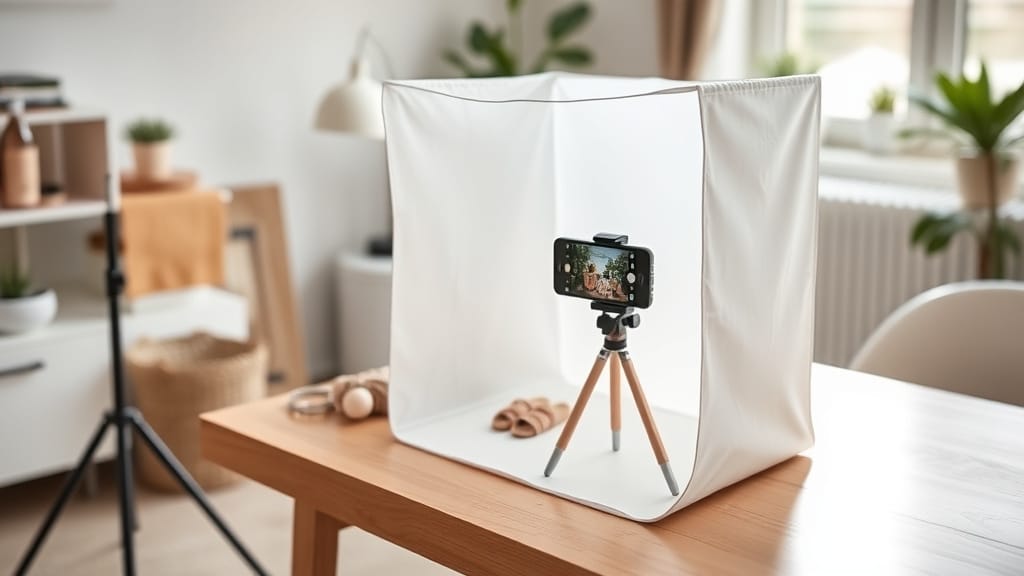
How to Build a DIY Lightbox
A lightbox (or light tent) wraps your product in soft, even illumination — perfect for small items like jewellery, cosmetics, electronics, or accessories. Commercial lightboxes start at around £25, but you can build one for under £10 with household items.
What you need
- A cardboard box (roughly 40–60 cm on each side)
- White Christmas lights (white only — not multicoloured)
- Kitchen foil
- Tracing paper
- Double-sided tape and regular tape
- A craft knife, ruler, and marker
Step-by-step build
- Cut windows in three sides of the box, leaving a 3–4 cm border from each edge
- Line the inside with kitchen foil (shiny side out), fixed with double-sided tape — this amplifies and distributes the light
- Cover the windows with tracing paper taped to the inside — this diffuses the light for soft, even illumination
- Punch a small hole in the back or side for the light cable
- Thread the Christmas lights inside, spreading them evenly across the top and sides
- Close the box, switch on, and you have a fully functional light tent
For height adjustment, tape the box to an adjustable stand or stack it on books.
This simple build produces remarkably even lighting that can genuinely match commercial setups costing ten times more. If you don't have Christmas lights to hand, you can pick them up from any pound shop or online for a few quid.
Backgrounds
The background you choose has an enormous impact on how your product is perceived. Choose wisely.
White backgrounds: the eCommerce standard
White is the default for product photography — and for good reason:
- Marketplace requirements: Amazon, eBay, and most eCommerce platforms require or strongly recommend a pure white background for main listing images
- Even light reflection: White bounces light uniformly, giving you more control over the final image
- Versatility: Works with virtually any product type, colour, or size
- Clean and professional: Puts the focus squarely on the product
DIY white background options:
- White poster board or foam board (cheapest, works brilliantly for small items)
- White muslin fabric draped from wall to table (creates a seamless "sweep")
- Large sheet of white paper taped to the wall and curved down onto the table
- White vinyl backdrop (wipe-clean, durable, reusable)
Creating a sweep: Tape your white backdrop material to the wall behind your table, letting it curve gently down and across the surface. This eliminates the visible line where the table meets the wall, creating a seamless, infinite-looking background. Don't crease or fold the material — smoothness is everything.
Coloured and textured backgrounds
Not every shot needs white. Lifestyle images, social media content, and brand-building photography often benefit from colour and texture.
| Background Type | Best For | Watch Out For |
|---|---|---|
| Black | Luxury, premium feel, jewellery, watches | Avoid with dark-coloured products — they'll disappear |
| Pastel colours | Bright or colourful products, beauty, food | Can look cheap if the colour clashes |
| Textured (linen, wood, marble) | Lifestyle shots, artisan goods, home decor | Texture must complement, not compete with the product |
| Patterned / busy | Bold branding, street-style fashion | Very easy to overpower the product — use sparingly |
| Natural (outdoors, plants) | Sustainable brands, organic products | Inconsistent lighting makes catalogue shoots tricky |
8 budget DIY background ideas
- Foam board — clean, seamless, costs a few pounds
- Wrapping paper — instant colour and pattern (choose thick stock)
- Fabric offcuts — linen, velvet, or cotton from a charity shop
- Vinyl samples — wipe-clean, available in marble, wood, and stone effects
- Tile samples — free from many DIY stores, great for texture
- Felt sheets — smooth, seamless, cheap from craft shops
- Sand or pebbles — natural texture for outdoor or artisan brands
- Kitchen foil — creates a reflective, metallic effect for edgy product shots
Choosing the right background for your product
- Brightly coloured products — use neutral backgrounds (white, light grey) so the product stands out
- Neutral-coloured products (black, white, grey) — you have the most flexibility; almost any background works
- Patterned products — stick to solid colours to avoid visual clutter
Setting Up Your Shooting Space
You don't need a dedicated studio. A corner of a room, a garage, or even a kitchen worktop will do. Here's what matters:
The table
Choose a sturdy, flat surface between 60–70 cm wide. A folding table works perfectly — easy to set up, easy to store. The table is your stage, so keep it clean and uncluttered.
Location
- Indoors: Position near the largest window in the room. Avoid rooms with small windows or coloured walls (they'll reflect unwanted colour onto your product)
- Outdoors: Open shade works brilliantly — a covered porch or the shaded side of a building. Avoid direct sunlight
The setup sequence
- Place your table beside the window
- Tape your white backdrop to the wall, curving it down across the table
- Turn off all room lights
- Position your product in the centre of the sweep
- Place a foam board reflector opposite the window
- Mount your camera on a tripod, level with the product
- Take a test shot and adjust
Tripods: non-negotiable
A tripod is one of the few items we'd call genuinely essential. It eliminates camera shake (the number one cause of soft, blurry product images) and ensures consistent framing across a batch of products.
Look for one with:
- Adjustable legs (for shooting at different heights and angles)
- A ball head that tilts in multiple directions
- Enough stability to hold your camera or phone steady
Budget tripods start at around £15–£25 on Amazon. If you're shooting flat lays, get one with a horizontal arm or overhead mount.
Camera Settings That Actually Matter
Even if you only shoot on auto, understanding these four settings will dramatically improve your results.
White balance
Set to Auto (AWB). Your camera will adjust to match the colour temperature of your light source. If you're editing in post, you can fine-tune this later.
ISO
Set as low as possible — ideally ISO 100. Lower ISO means less digital noise and cleaner images. Because you're using a tripod, you can afford a longer exposure time without worrying about shake.
Flash
Turn it off. Always. The built-in flash on cameras and phones produces harsh, flat, unflattering light. Your window light or LED panels will do a far better job.
Exposure / aperture
If your camera supports manual or semi-manual modes:
- Manual (M): Set the aperture (f-stop) to f/8 or higher for maximum depth of field — this keeps the entire product sharp. Then adjust the shutter speed until the exposure looks right on the screen
- Aperture Priority (Av): Set the f-stop to f/8–f/11. The camera handles the shutter speed automatically
- Full Auto: Use the exposure compensation dial (often marked +/-) and set it to +1 or +1.5 to brighten the white background
Image format
Shoot in RAW if your camera supports it — this gives you the most flexibility in editing. If not, use the largest JPEG setting available. For smartphones, enable the "high quality" or "maximum resolution" option in camera settings.
Styling, Props, and Composition
Keep it simple
The product is the hero. Everything else in the frame should support it, never compete with it.
- Make sure labels and logos are straight, centred, and legible
- Remove dust, fingerprints, and stray threads before shooting
- Use a lint roller on fabric products
Props with purpose
Props should tell a story about how the product is used — a coffee mug on a wooden desk, a candle beside a stack of books. But follow one rule: less is more. If a prop doesn't add context or value, remove it.
Colour theory
The colours in your image trigger emotional responses:
- White/neutral: Clean, professional, trustworthy
- Warm tones (orange, red): Energy, urgency, appetite
- Cool tones (blue, green): Calm, trust, nature
- Black/dark: Premium, luxury, sophistication
Choose colours that match your brand identity and the emotion you want customers to feel.
Show the details
Online shoppers can't pick up your product. Compensate by shooting:
- Multiple angles (front, back, side, top)
- Close-ups of textures, stitching, materials, labels
- Scale shots (product next to a common object for size reference)
- In-use or lifestyle shots alongside your clean white-background images
Use your camera's optical zoom to get close rather than digital zoom, which degrades quality.
Post-Production and Image Optimisation
Even with a perfect setup, raw photos always need some editing before they're listing-ready.
Essential edits
- White balance correction — ensure whites look truly white, not grey or yellow
- Exposure adjustment — brighten if needed so the background is pure white
- Colour accuracy — the product colour on screen should match the real thing (this reduces returns)
- Sharpening — a subtle sharpen makes products look crisp and professional
- Cropping and alignment — consistent framing across your catalogue looks polished
Image optimisation for web
Large image files kill page speed, and slow pages kill conversions. Aim for:
- File size: 100–300 KB per image for web use
- Dimensions: Follow your platform's guidelines (Amazon recommends 2000 px on the longest side for zoom functionality)
- Format: JPEG for product photos, PNG only when you need transparency
- Alt tags: Include descriptive, keyword-rich alt text for every image — this helps SEO and accessibility
When to outsource
If editing becomes a bottleneck — and it often does when you're shooting hundreds of SKUs — outsourcing to a specialist service saves significant time.
Start your free trial with Pixel By Hand and send us your images for a complimentary sample edit. We handle background removal, colour correction, retouching, ghost mannequin editing, and more — so you can focus on running your business.
Common Mistakes to Avoid
After editing millions of product images, we see the same mistakes repeatedly. Avoid these and you're already ahead of most sellers:
| Mistake | Why It Hurts | Fix |
|---|---|---|
| Leaving room lights on | Creates mixed colour temperatures and a yellow cast | Turn off every light except your chosen source |
| Using digital zoom | Degrades image quality significantly | Move the camera closer or use optical zoom |
| Shooting with the flash on | Produces harsh, flat lighting with ugly reflections | Turn the flash off permanently |
| Creased or wrinkled backdrop | Looks unprofessional and creates unwanted shadows | Iron fabric backdrops or use foam board/paper |
| Inconsistent framing | Makes your product catalogue look chaotic | Use a tripod and mark product positions with tape |
| Over-editing | Unrealistic colours lead to customer returns | Aim for colour accuracy, not Instagram filters |
| Ignoring file size | Massive images slow your website and hurt SEO | Compress images to 100–300 KB for web |
| Skipping close-up shots | Customers can't assess quality or details | Shoot at least 2–3 detail/texture close-ups per product |
FAQ
How much does a basic DIY product photography setup cost?
You can get started for under £75 if you already have a smartphone. The main expenses are a tripod (£15–£25), backdrop materials (£5–£15), and foam board reflectors (£5). If you're buying a dedicated camera, budget £300–£500 on top.
Can I really use my smartphone for professional product photos?
Absolutely. Modern smartphones with 12+ MP cameras produce images that are more than good enough for eCommerce listings. The quality of your lighting and backdrop matters far more than the camera itself. Many of our clients at Pixel By Hand shoot exclusively on iPhones.
What's the best lighting for product photography on a budget?
Natural window light combined with a white foam board reflector is the best free lighting setup available. Position your product beside a large window, turn off all room lights, and use the foam board to bounce light back and fill shadows. For shoots that require consistency, a pair of LED panels (£40–£100) is the next step up.
Do I need a lightbox?
A lightbox is particularly useful for small, reflective, or detailed items — jewellery, electronics, cosmetics, and similar products. You can build one from a cardboard box, Christmas lights, and tracing paper for under £10. For larger products, a table-and-backdrop setup with window light or LED panels works better.
Why do my white backgrounds look grey in photos?
This is almost always an exposure issue. Your camera's metering system tries to make everything mid-grey, which underexposes white backgrounds. Fix this by increasing exposure compensation to +1 or +1.5, or by manually adjusting the shutter speed until the background appears bright white. Any remaining grey cast can be corrected in post-production.
Should I edit my own product photos or outsource?
If you're shooting fewer than 50 images per month and have basic editing skills, doing it yourself with free tools like GIMP or Canva is reasonable. Beyond that, editing becomes a significant time sink. Send us your images for a free sample edit and see the difference professional retouching makes — most of our clients find it saves them 5–10 hours per week.
Ready to Take Your Product Images to the Next Level?
A good DIY product photography setup gets you 80% of the way there. Professional post-production handles the final 20% — the difference between images that look decent and images that actually convert browsers into buyers.
At Pixel By Hand, we work with eCommerce businesses worldwide to perfect their product images. Whether you need background removal, colour correction, retouching, or ghost mannequin editing, our team delivers consistent, marketplace-ready results — typically within 24 hours.
Start your free trial today — send us a selection of your images and we'll show you what we can do. All sample edits are completely free.